- Blog
- 06.09.2021
Accessing Your Snowflake Data Using Snowpark

Snowflake recently announced the release of its new Snowpark Accelerated program. Snowpark provides developers with the option to write code in their language of choice, such as Scala, Java, or Python, which can subsequently be run against data stored within the Snowflake Data Cloud.
Snowpark is a client library for querying and interacting with the Snowflake database and has several features that distinguish it from other client libraries. For example, the ability to construct SQL statements; the API has a select mode that lets you specify the column names to return, rather than writing a traditional select statement that includes the required column names within a string. Although you can still use a string to specify the SQL statement to execute, you can also opt to use modern features like intelligent code completion and type checking when you use the native language constructs provided by Snowpark.
Using Snowpark: Setting up the development environment
To start using Snowpark, you will need to download the Snowpark library (supplied as a TAR archive) and set this up in a local environment. Once you have it downloaded (and the archive file signature verified), together with your IDE of choice, you have all you need locally to begin developing programs to interact with your data.
In this example, we used Visual Studio Code as our IDE, simply out of familiarity. Snowpark also works with a number of alternatives, including IntelliJ, Scala REPL and Jupyter Notebooks.
As we decided to test out Snowpark using Scala, we used the Metals extension within Visual Studio Code in order to take advantage of productivity enhancements such as code completion and hints.
In addition, we needed to set up a user in Snowflake, against which we could assign the relevant rsa_public_key to establish a secure connection between our local and remote systems. Once we created the user, we assigned the public key using the ALTER USER command as follows:

In a moment, we’ll use the associated private key in our local environment to establish the connection.
Creating our first Snowpark project
With the local and remote setup in place, we’re now ready to put together our first Snowpark program (Our Hello Snowflake, following the long-held tradition of Hello World!).
First, we create our workspace directory, within which our subdirectories will be created to hold each projects’ files. In our case, we named this SnowPark.
Then, using Visual Studio Code, choose File|Open Folder, navigate to the SnowPark directory, and choose Select Folder.
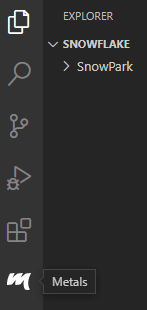
Now, we click on the Metals icon in the activity bar…
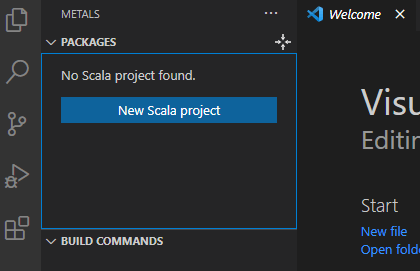
… and click the New Scala project button under the Packages section in the displayed window.
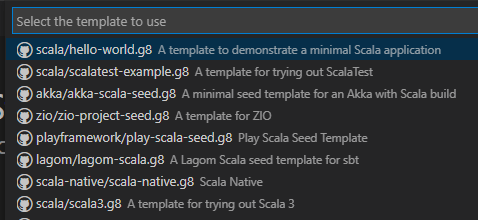
We can base our projects upon a number of preconfigured templates – in this case, we’ll use the scala/hello-world.g8 to create our test project.
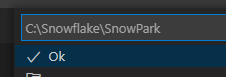
We’re now prompted to select the workspace (directory), within which the project will be generated (in our case c:\Snowflake\SnowPark …
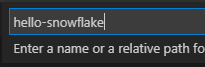
… and finally we’re asked to provide the name for the project (this will generate a subdirectory of the same name in our workspace).
Pressing Enter initiates the creation of our new Scala project.
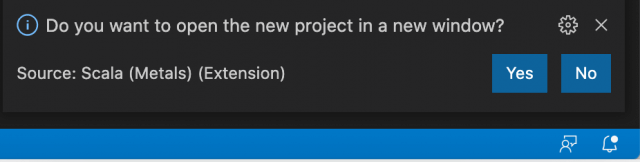
When prompted (this dialogue will appear in the lower right hand corner of the Visual Studio Code window), select Yes to open the project in a new window.
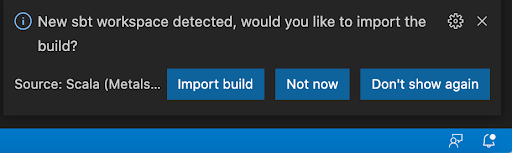
As part of the project initialization, when prompted, select Import build from the dialogue (again, displayed in the lower right hand corner of the Visual Studio Code window).
Once the import is complete, we have a valid Scala program at our disposal. All we need to do now is add the code to make the program useful in some way.
Configuring our project to work with Snowpark
Before we can make use of Snowpark, we need to carry out a few configuration steps within our newly established project.
At this time, Snowpark supports Scala 2.12 (and earlier), and we need to reflect this within our project.

Within the explorer window, we now have a structure that represents our hello-snowflake project. Clicking on the build.sbt entry in the tree opens the contents of this file in the main window.
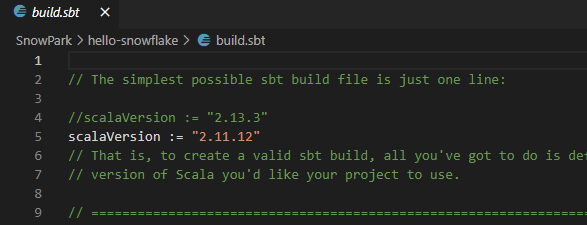
Here we’ve set our version of Scala to 2.11.12 from the default 2.13.3. After making the change, select File|Save to save this update.
Again, when prompted, select Import changes to bring the updated build.sbt file into the project.
Add the Snowpark library to the project
Returning to the Snowpark archive, we downloaded an earlier copy of the lib folder into the project folder.
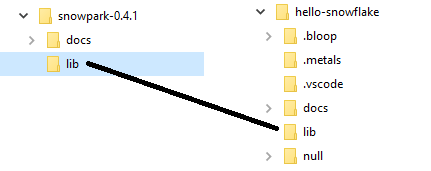
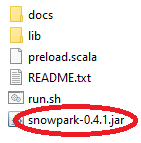
We copy the Snowpark jar file into the project lib folder.
Finally, in the build.sbt file we add the line:

Now we can write some code!
Crafting the program
To get up and running quickly we used the template code supplied by Snowflake, simply replacing the required variable placeholders with the relevant values to connect to our Snowflake environment.
The template code is as follows…
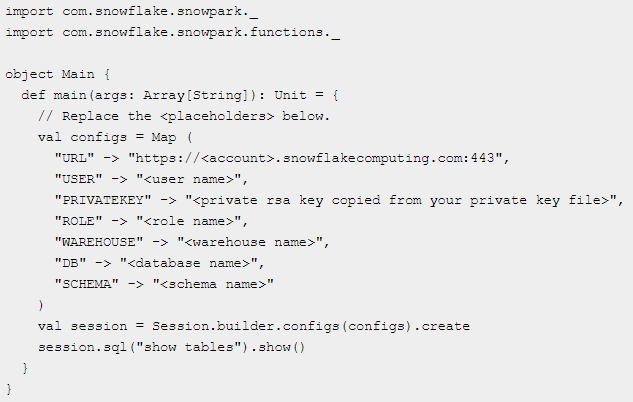
… and should be used to replace the contents of the Main.scala file within our project. Substitute the template placeholders as follows:
| Template Entry (in brackets) | Required Value |
|---|---|
| account | This will be the acme-corp.eu-central-1 as used in the URL to access your Snowflake account https://acme-corp.eu-central-1.snowflakecomputing.com/
|
| user name | The user you wish to use in connecting to the above account - in our case snowpark_user. |
| private rsa key copied from your private key file | The private key generated as the pair matching up to the public key associated with the Snowflake user set in the above. |
| role name | The role to assume when we make the connection. |
| warehouse name | The warehouse (compute) to use when we make the connection. |
| database name | The database to use when we make the connection. |
| schema Name | The default schema used when referencing objects in the selected database. |
Now, if everything has been set up correctly we should see …
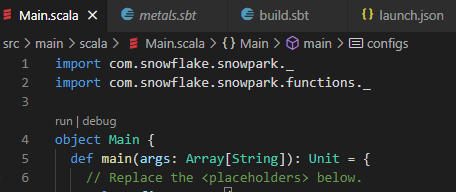
… in the Main.scala window within Visual Studio Code.
Clicking the run option will now execute the SQL code located in the session.sql code segment and display the results within the DEBUG CONSOLE in the lower part of the Visual Studio Code window.
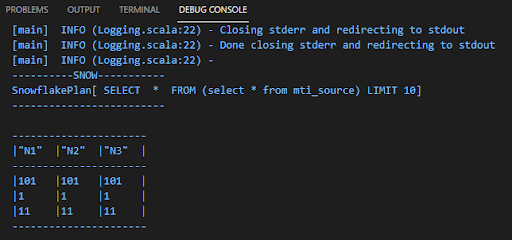
And we now have a working program utilizing Snowpark to gain access to our Snowflake data!
Faster time to business value
With this configuration, you should be able to access your Snowflake data from within programs developed in your preferred coding language, carrying out complex operations to deliver value from this data to the business. With this capability, your developers can focus more on the transformation of the data for faster insights, and less on the coding needed to achieve these objectives.
How Snowpark can change the way we work with data
Snowpark is a serverless framework that works well for scalar functions and simple data operations that don’t rely on other services. A major shift in data integration that we’ve seen in recent years is the use of historical data or trending analysis to determine the nature of the orchestration and transformation rules. Transformation services increasingly rely on external web services within a data pipeline. This can be seen extensively in fraud detection and other real-time data use cases. If Snowpark adds extensions to allow third-party services to be incorporated into data pipelines, this could massively expand the scope of data functions that could be executed directly within the Snowpark address space. This could further allow the historical nature of data to drive the context-aware use case that defines the current customer360 experience.
Learn More About Matillion ETL for Snowflake
Does your enterprise use Snowflake? Learn more about how Matillion ETL for Snowflake can help your data team be more productive and bring faster time to business value for your whole organization.
Visit us at Snowflake Summit 2021
If you’re attending Snowflake Summit 2021, visit our virtual booth to learn more about how Matillion ETL for Snowflake can help your data team be more productive in Snowflake and bring faster time to business value for your whole organization.
Featured Resources
What Are Feature Flags?
Feature flags are a software development tool that has the capability to control the visibility of any particular feature. ...
BlogHow Your Data Teams Can Do More With Marketing Analytics
Improve your marketing analytics with Matillion Data Productivity Cloud that enables businesses to centralize and integrate ...
BlogThe Importance of Data Classification in Cloud Security
Data classification enables the targeted protection and management of sensitive information. Personally Identifiable ...
Share: