- Blog
- 04.22.2024
- Data Productivity Cloud 101, Data Fundamentals
Building a Type 2 Slowly Changing Dimension in Matillion's Data Productivity Cloud
Slowly Changing Dimensions (SCD) is an important concept in Data Warehousing. It is a data modeling technique that enables the business to start tracking changing attributes across the organization. For example, say you have a customer who has moved to another country, and there is a report that is measuring the amount of sales by country. If historical data is not tracked on this customer, the sales amount towards this customer will be fully allocated to the new country.
If their addresses were tracked, the report would be able to correctly separate the sales amount from country A to country B. The same is true for any other customer, product, or changing attribute across the business.
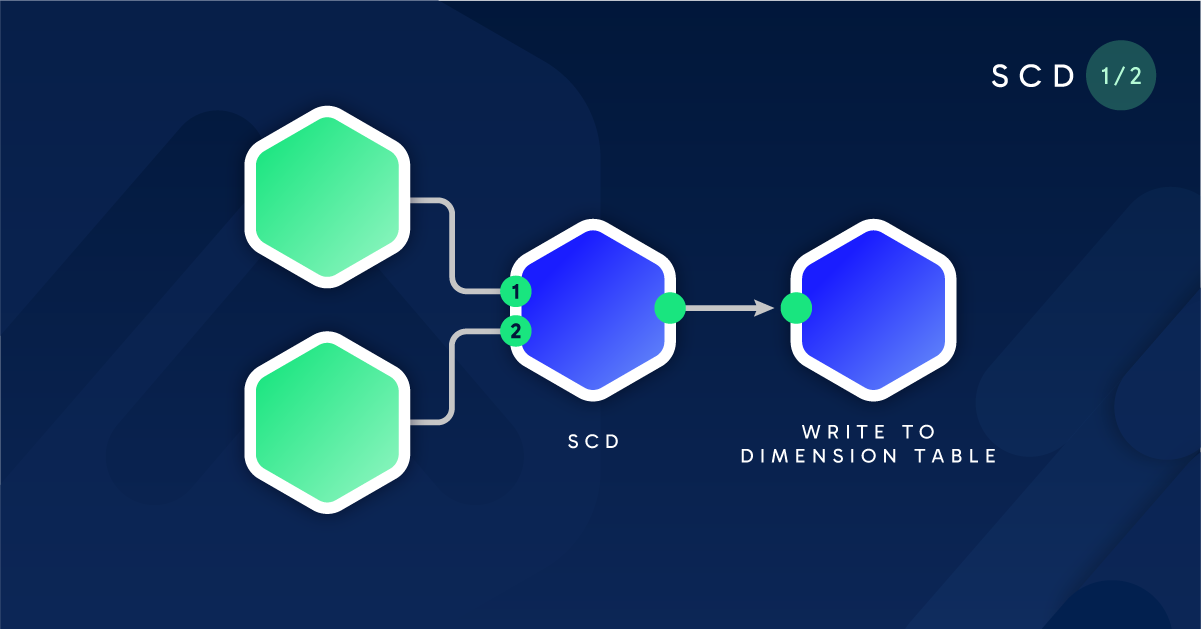
There are several types of Slowly Changing Dimensions; however, this blog will focus on how to develop an SCD Type 2.
This is the first part of a two-part series in which we will explore how to build a dynamic, Slowly Changing Dimension pipeline.
Data Preparation
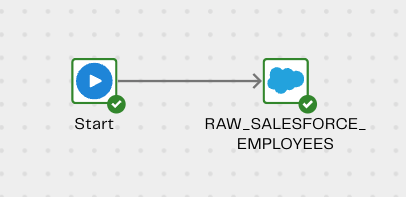
In this exercise, we will use fictitious data extracted from Salesforce to track changes in Employee names or inactivity. Using Matillion’s Data Productivity Cloud, I have started an Orchestration Pipeline, where I have set up a native Salesforce Connector to extract this raw data and store it in a table called RAW_SALESFORCE_EMPLOYEES.
For details about Salesforce Data Ingestion, please refer to this documentation: https://docs.matillion.com/data-productivity-cloud/designer/docs/salesforce-query/
Here is the output of the data we will be working with.
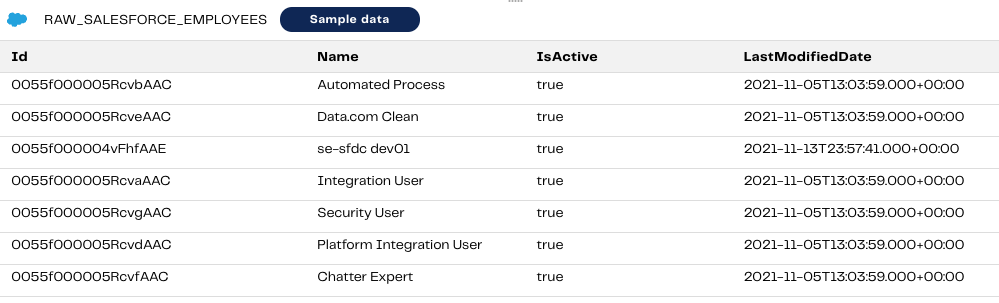
From the screenshot, we can see that currently, all Employees are “Active”. However, we’d like to keep track of changes to this so that when reporting on # of Active employees in the current month, it will be accurate.
Before we begin developing the SCD pipeline, let’s create a Dimension Table with the columns we need to start tracking the historical changes to our data. Using a Create Table component, we will define the dimension table with the following columns:
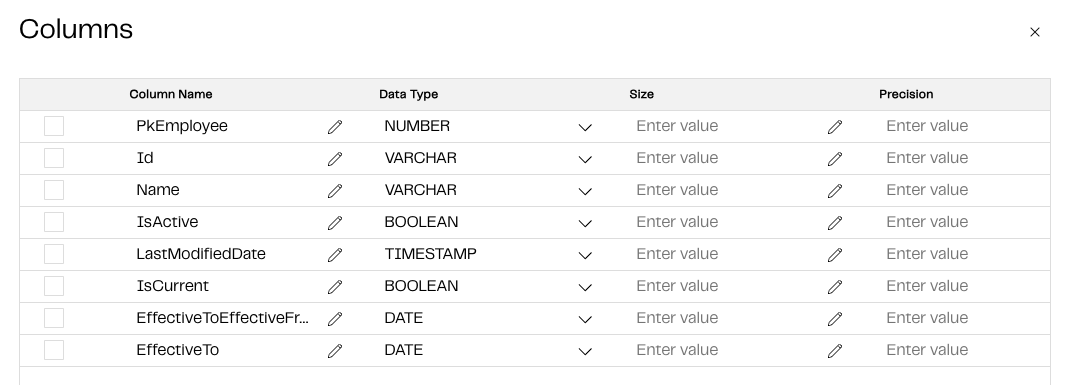
On the Create Table component, we can set the Create/Replace property to Replace for the time being.
The final Orchestration pipeline should look like this:
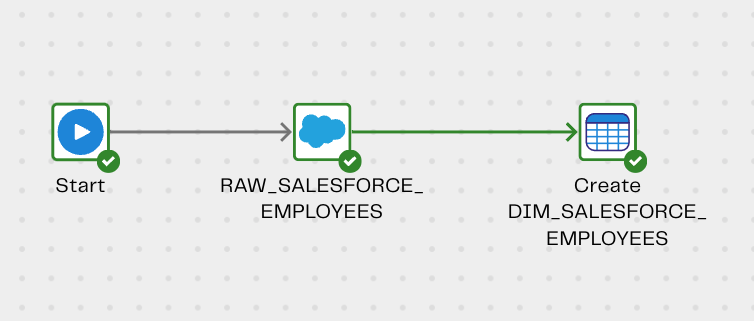
After executing the above, we will now end up with two tables in our Snowflake environment:
- RAW_SALESFORCE_EMPLOYEES
- DIM_SALESFORCE_EMPLOYEES
SCD Data Transformation
The next step is to develop a Transformation pipeline that will populate the dimension table, DIM_SALESFORCE_EMPLOYEES.
Let’s take the following steps to begin building out the Slowly Changing Dimension flow.
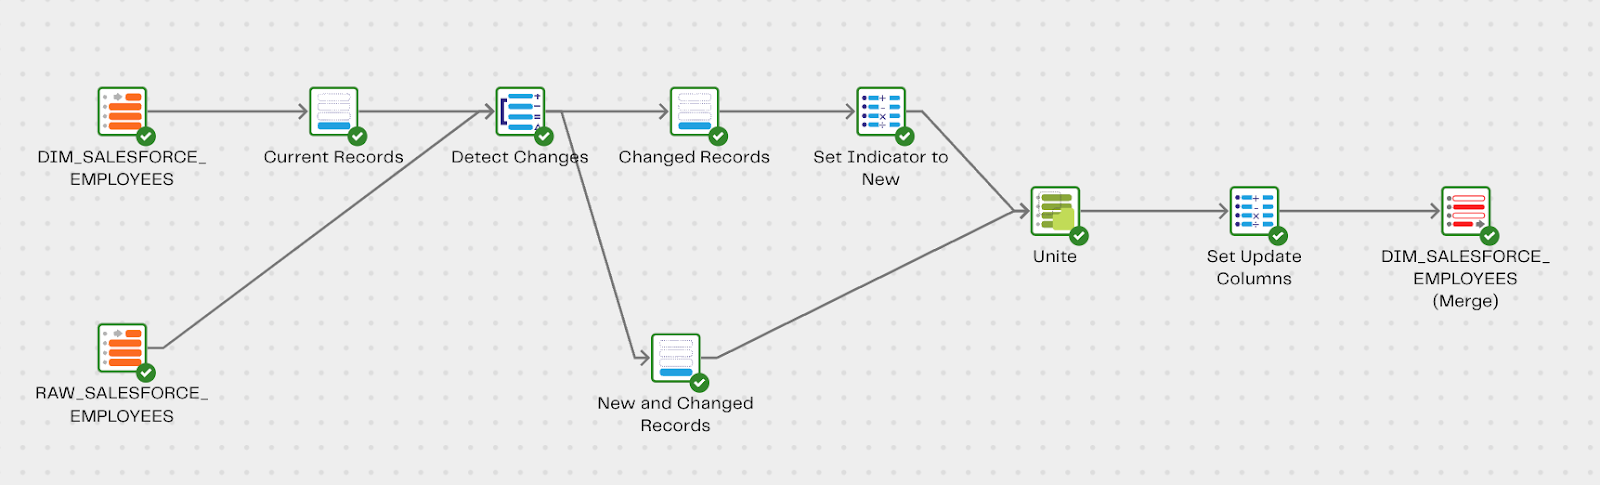
Step 1: Table Input components
To start off, we will use 2 Table Input components, selecting the 2 tables from the previous section and selecting all the columns:
- RAW_SALESFORCE_EMPLOYEES
- DIM_SALESFORCE_EMPLOYEES
Step 2: Filter component to grab Current records from the dimension table
We will then need to use the Filter Component to filter our dimension table to current records only. This allows us to compare the new raw data (whenever RAW_SALESFORCE_EMPLOYEES is refreshed), to the current dimension records only. The name of this component will be Current Records so it is easy to understand what’s happening.
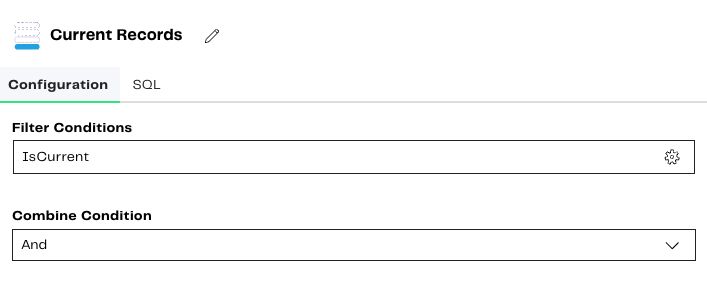
’
Note: Currently, the DIM_SALESFORCE_EMPLOYEES table is still empty so you will not see any records in the samples!
Step 3: Detect Changes Component to compare the two tables
The Detect Changes component allows you to compare column changes between two input tables. We will want the inputs to be Current Records (from Step 2), and RAW_SALESFORCE_EMPLOYEES (from Step 1). The output will indicate what change has occurred:
- C the record has been changed.
- D the record has been deleted.
- I the record is identical.
- N the record is new.
Let’s take a look at the configuration of this component:

For Match Keys, the Id column is used as it is the unique identifier (primary key) of the records.
For Compare Columns, we are checking columns Name and IsActive to see if there are changes.
For the Output Column Mapping, see below:
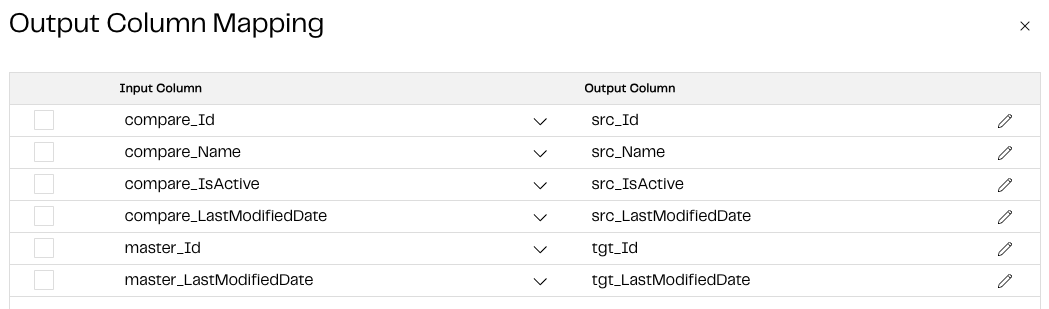
Columns with the master prefix come from the Current Records input, and columns with the compare prefix come from the RAW_SALESFORCE_EMPLOYEES input. We are simply specifying the output columns we want and renaming the prefixes src and tgt, respectively, to be used in the next steps.
Here is the Sample output of the Detect Changes component after the configuration is complete. The Indicator column represents how we should handle the records moving forward.
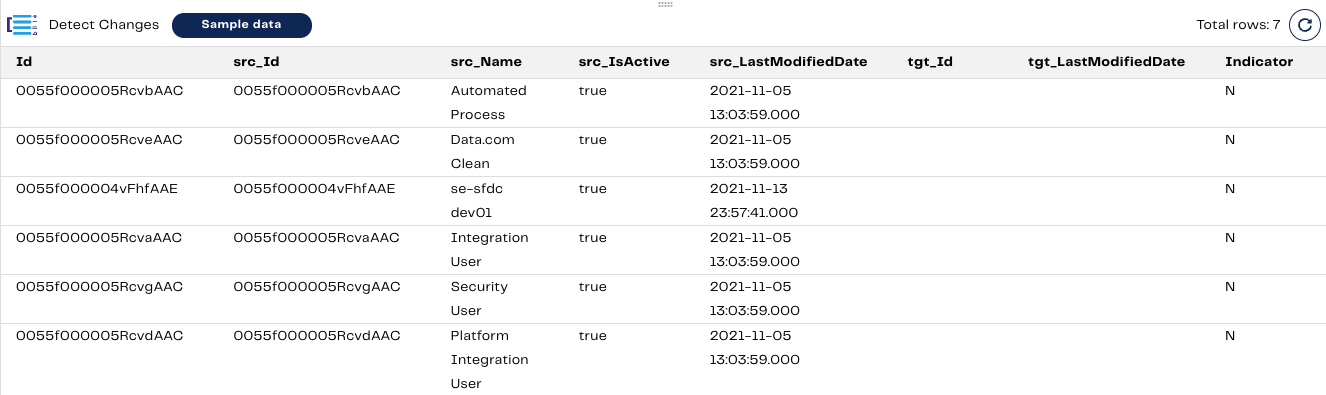
Note: Since DIM_SALESFORCE_EMPLOYEES is empty, it has automatically determined that all the input records are represented as N (a new record).
Step 4a: Filter component for Changed Records
The Filter component will now be used to filter for changed records only, based on the Indicator column of the previous Detect Changes component.

Name this component Changed Records.
Step 4b: Filter component for New and Changed Records
The Filter component will also be used to filter for both new and changed records, based on the Indicator column of the previous Detect Changes component.

In this scenario, we want either condition to be true, so we will need to update the Combine Conditions property.
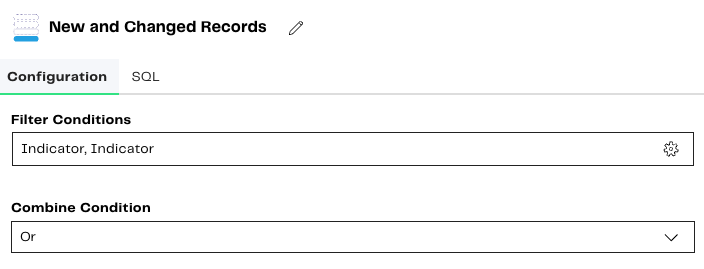
Name this component: New and Changed Records.
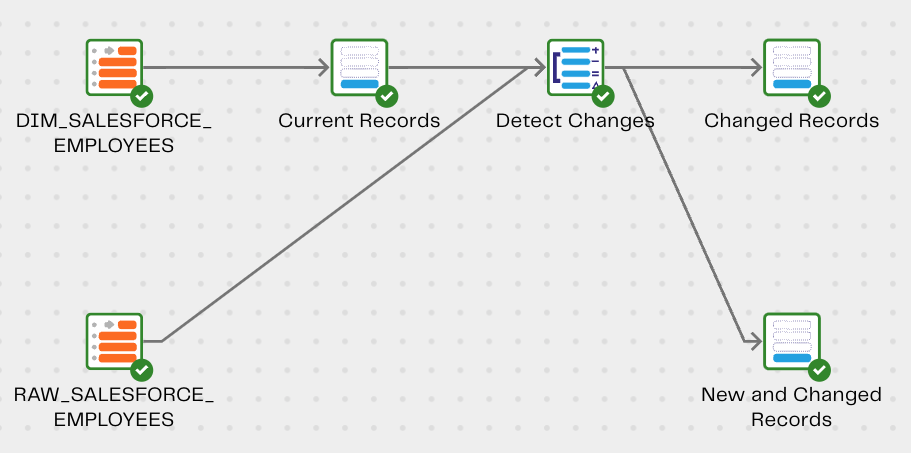
Our pipeline should now look like this.
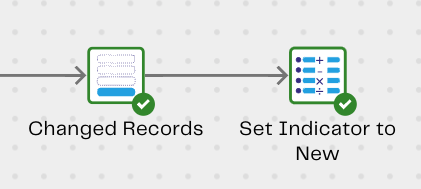
Step 5: Calculator component to override Indicator column on Changed Records
In this section, we want to treat all Changed records as New. The reason is that at the very end of the pipeline, we are using a Table Update component to Merge all new and changed records into our dimension table. Behind the scenes of the Table Update, we are using a Snowflake Merge statement, which allows you to simultaneously Insert AND Update records in a single statement! This is much simpler and more efficient than running two separate statements.
In this Calculator component, we simply want to replace the “C” Indicator values with “N.” The final step will clarify this.
Name this component Set Indicator to New.
Note: We will not see any records in this step yet as our dimension table is still empty. This will become clearer when we start simulating changes to our source data.
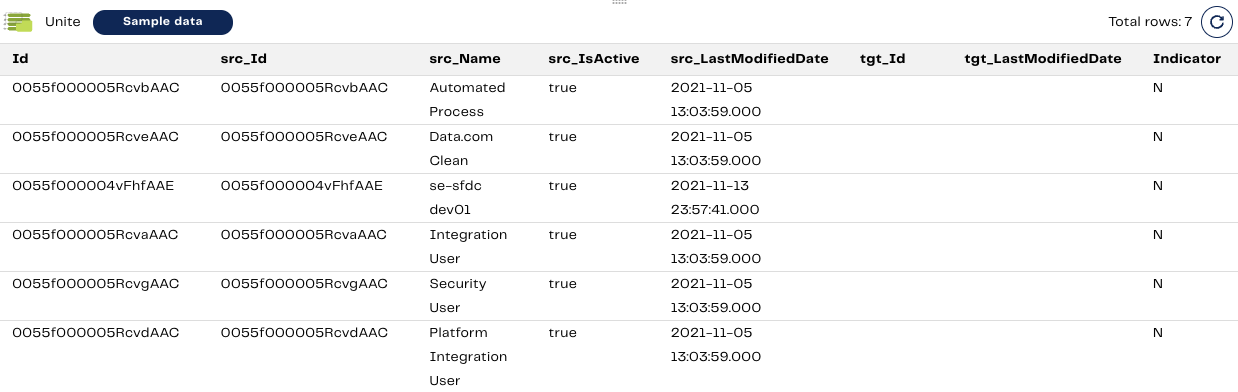
Step 6: Unite components to combine records from Changed and New/Changed Records
Since we are preparing for the final Table Update as described in the previous step, we will now need to combine the records from the New and Changed Records and Changed Records components from Step 4.
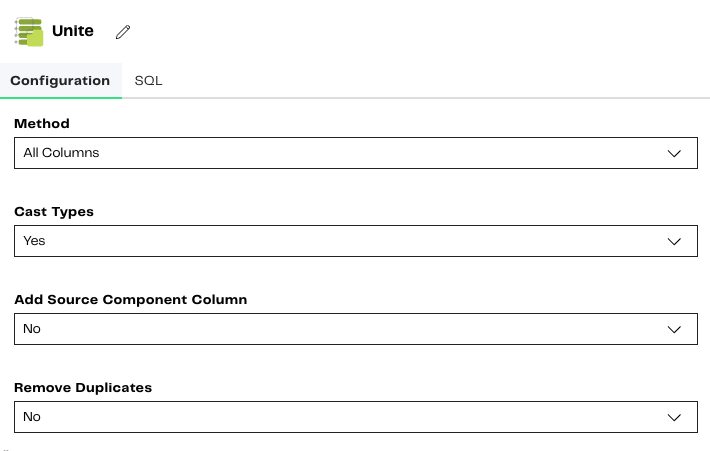
Since we already determined that there are only New records, the sample of this output has not changed:
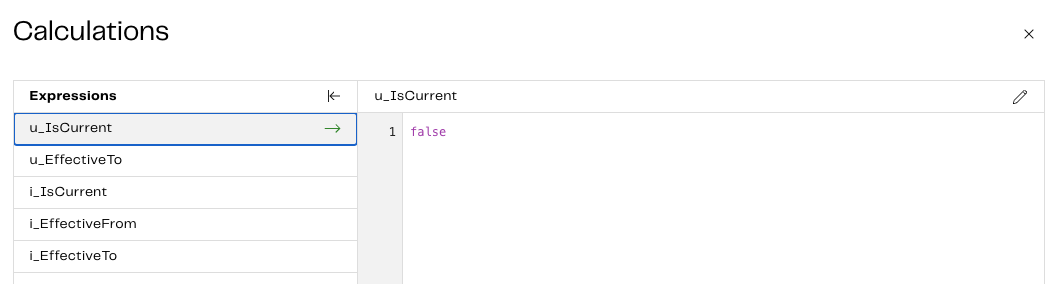
Step 7: Calculator component to add new calculated columns for SCD
In this step, we will be adding 5 new calculated columns. These columns will be used to track current records effective dates (start and end). These calculated columns will be used for both Insert and Updates within the Table Update component. We will be pre-fixing the calculated columns with a u_ to represent that they will be used for updates and i_ to represent that they will be used for inserts. These 5 calculated columns and their values will be as follows:
| Expression | Value | Explanation |
| u_IsCurrent | false | Any records we update (changed) will no longer be the current record; hence we will set this to false. |
| u_EffectiveTo | DATEADD(days,-1, "src_LastModifiedDate") | Updated records need to have their effective end date to the prior day. This can be changed to seconds if data is being updated more frequently. However, we’re assuming daily refreshes in this example. |
| i_IsCurrent | true | Any records we insert (new) will always be the current record; hence we will set this to true. |
| i_EffectiveFrom | CASE WHEN "tgt_Id" IS NULL THEN '1900-12-31' ELSE "src_LastModifiedDate" END | Inserted records that are completely new will have a ‘1900-12-31’ start date. Otherwise, if it’s a change (but we’re also doing an insert), it will use the LastModifiedDate. |
| i_EffectiveTo | ‘9999-12-31’ | Any inserted records will always have a ‘9999-12-31’ effective end date to represent that this |
Name this component Set Update Columns.
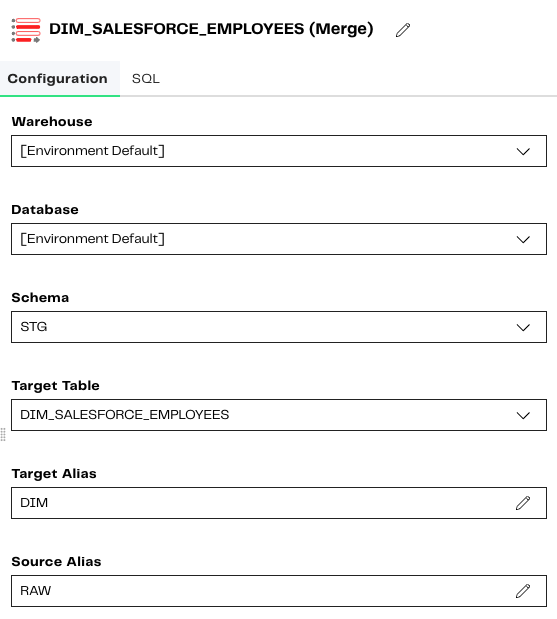
Step 8: Table Update component to Merge all fields into the dimension table
The final step is to use a Table Update component to Merge all the required records into the dimension table. The Set Update Columns component from Step 7 will be the only input into this.
Start by selecting the required tables and providing the appropriate aliases to be used in the expressions. In our example, the tables are located in different schemas. This is recommended but not required.
For our Join Expression property, use the following logic: "RAW"."Id"="DIM"."Id" AND "RAW"."Indicator" = 'C'

When Matched property should be configured as follows:

Update Mapping property should be configured as follows:

These are setting the column values to the updated values calculated from step 7.
The Include When Not Matched property is set to Yes.
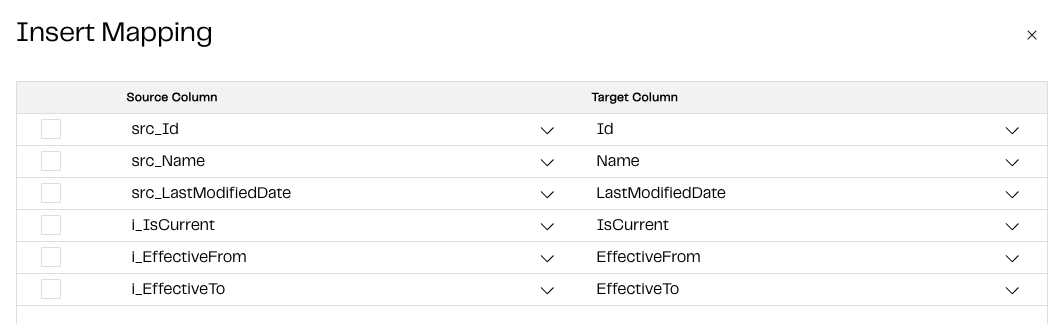
Finally, the Insert Mapping property should be configured as follows:
DataOps for Slowly Changing Dimensions
Now that we’ve completed the SCD Transformation pipeline, we can now test to ensure that the SCD is behaving as expected. Simply click the Run button to run the pipeline.

Since we are running this for the first time, the DIM_SALESFORCE_EMPLOYEES table should look identical to the RAW_SALESFORCE_EMPLOYEES table.
We will now simulate some changes to the source table, by updating an existing record, and also inserting a new record.
INSERT INTO RAW_SALESFORCE_EMPLOYEES
SELECT 'abc', 'Matillion User', TRUE, CURRENT_TIMESTAMP();
UPDATE RAW_SALESFORCE_EMPLOYEES
SET "Name" = 'Updated Name',
"IsActive" = False,
"LastModifiedDate" = CURRENT_TIMESTAMP()
WHERE "Id" = '0055f000005RcvbAAC';
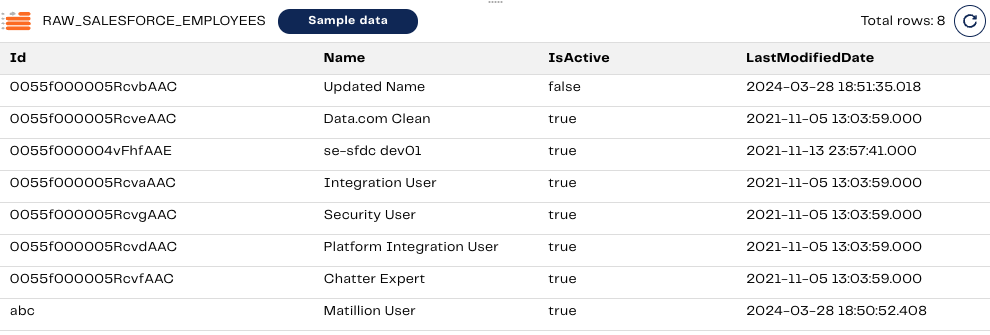
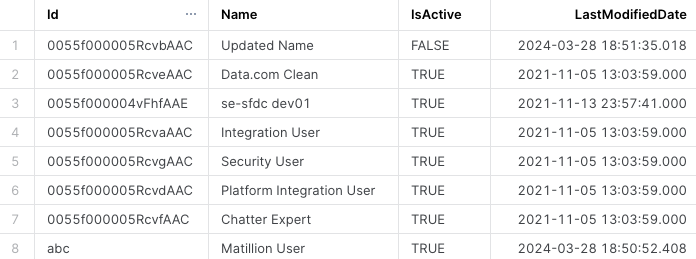
The RAW_SALESFORCE_EMPLOYEES table should now look like this.
Before we run the Transformation pipeline a second time, let’s observe what is happening along the way.
In the Detect Changes component, we can now see the changes to the Indicator column.
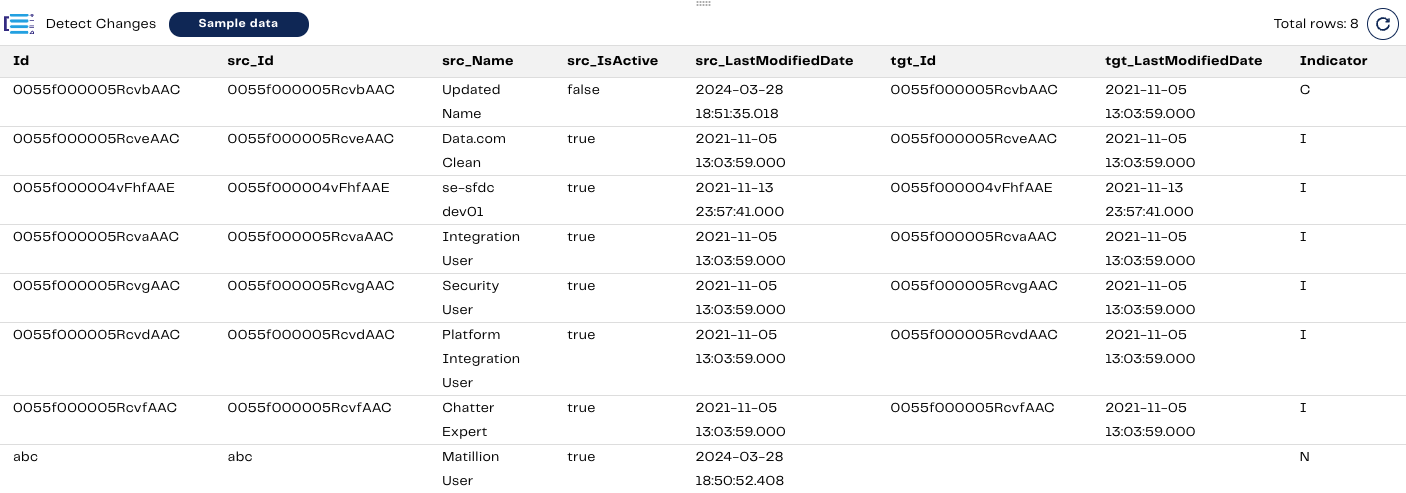
The newly inserted record is correctly flagged as N, and the updated record is correctly flagged as C. The rest are flagged as I, meaning no changes need to be made further here.
The Changed Records filter component and New and Changed Records filter component are shown below.


It would appear as we are duplicating the changed record however, when we are tracking SCD history, every changed record would also require a new inserted record, as well as updating the prior record with their respective effective dates. That is why the record above is displayed in both paths.
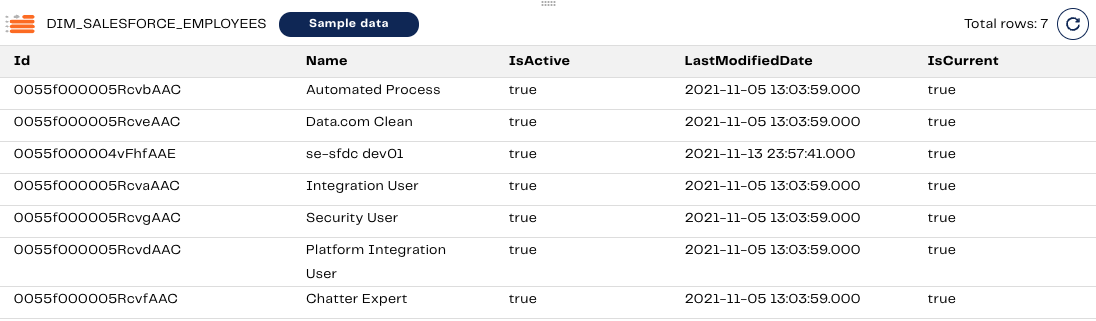
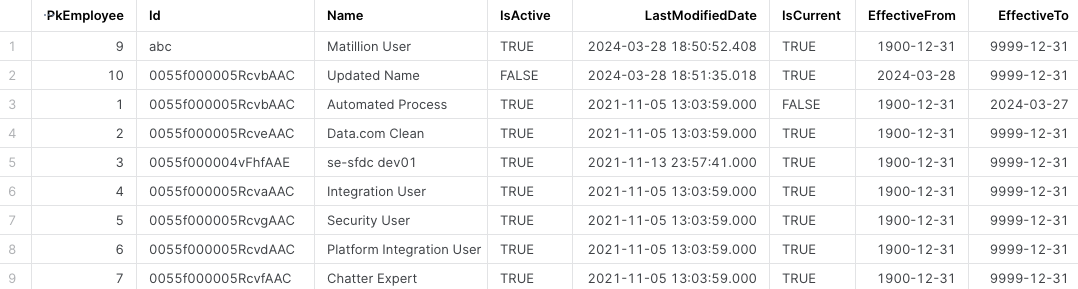
Let’s run the pipeline a second time. The DIM_SALESFORCE_EMPLOYEES table now looks like this.
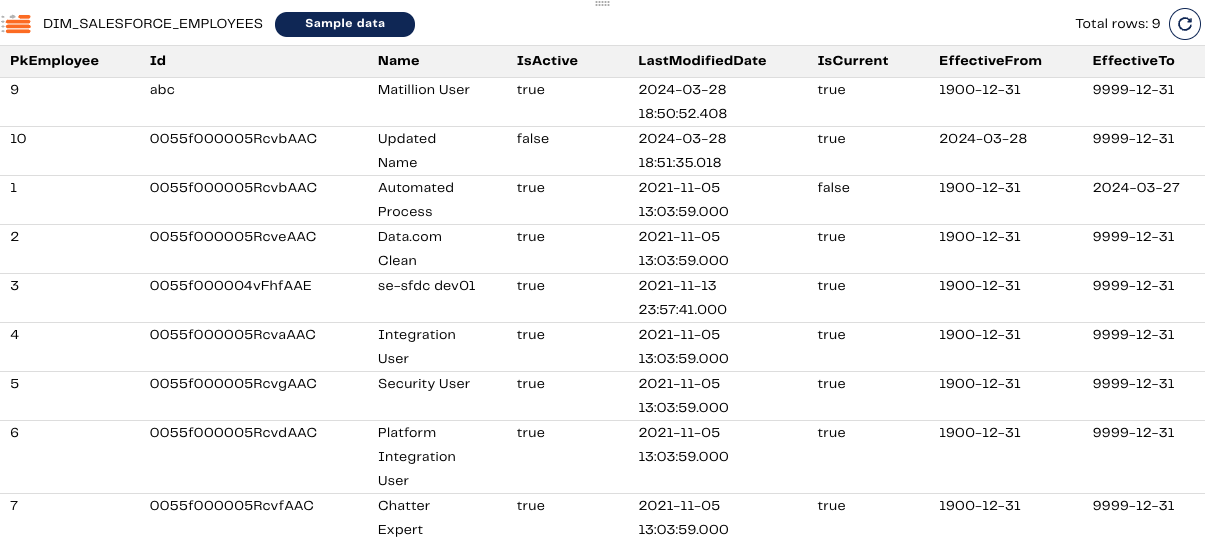
The first row, with Id “abc”, is a newly created record. It has the effective dates from 1900-12-31 to 9999-12-31.
Rows 2 and 3 contain the record that was updated with the same ID. We can see that the older record with the old name “Automated Process” has a new effective end date, which is the prior day 2024-03-27 (as of the writing of this blog). After changes to the name and activity flag, Row 2 now has an effective date from 2024-03-28 to 9999-12-31.
Type 2 Slowly Changing Dimension example
Now that we have confirmed that the SCD pipeline is behaving as expected let’s examine it in operation and see how this affects reporting.
If we revisit the metric at the beginning of the blog, # of Active employees in a given month, let’s write a script that can calculate this for us.
Let’s first take a look at the original raw dataset, RAW_SALESFORCE_EMPLOYEES.
If we run a query to calculate the # of Active employees in the March 2024, it would be the following:
SELECT COUNT(*)
FROM "ADRIAN_FUNG"."RAW"."RAW_SALESFORCE_EMPLOYEES"
WHERE "IsActive" = TRUE
The output would be: 8 records.
Now let’s take a look at our newly created and populated table, DIM_SALESFORCE_EMPLOYEES.
The query for # of Active employees in the March 2024, would now be:
SELECT COUNT(*)
FROM "ADRIAN_FUNG"."STG"."DIM_SALESFORCE_EMPLOYEES"
WHERE '2024-03-31' BETWEEN "EffectiveFrom" AND "EffectiveTo" AND "IsActive" = TRUE
The output would be 7 records.
Since we are now keeping track of historical changes to our employee attributes, it has correctly identified that employee “Automated Process” has a new name, “Updated Name” (same Id), however more importantly, the fact that it is no longer Active as of ‘2024-03-28’! Therefore, the query we wrote above is able to remove that employee from the calculation for March 2024.
In summary, creating a Slowly Changing Dimension allows the business to start keeping track of historical changes, thus leading to accurate reporting. Without it, any metrics reported will always be inaccurate and it will be difficult (or even impossible), to obtain the correct numbers.
Stay tuned for part two coming soon. We will explore how to build a dynamic, Slowly Changing Dimension pipeline!
Adrian Fung
Senior Sales Engineer
Featured Resources
Enabling DataOps With Data Productivity Language
Discover how Matillion leverages Git and the Data Productivity Language (DPL) to enable seamless implementation of DataOps ...
BlogCustom Connector for Public Statistics (Police API)
A demonstration of the practical steps for setting up components, manipulating and validating data, creating and scheduling ...
BlogMastering Git At Matillion. An In-Depth Guide To Merging
Merging in Git is the process of integrating changes from one branch into another. Merging is the backbone of collaboration in ...
Share: